|
|
Post by Crazygar on Nov 2, 2018 13:01:47 GMT -5
Musings, Observations and Thoughts...
First and foremost, I am starting to fix a problem that reared it's ugly head about 2 days ago. I noticed when I was misting that the ground was staying "extra" wet in the front in certain areas. This morning, my fears were confirmed with pools of standing water. Just tiny, but this problem needs to be cured before I can move on.
Standing water can equal BGA or Mold, neither of which do I want at this point. Therefore, I have taken a recommendation, to keep the tank completely covered, expose to air (15min still) once a day, and mist once a day.
What I need is high humidity, not super saturated soil, which is what I currently have. I used some of those cheapo paper towels to soak up the excess water and have the tank completely covered now, no 1/4" gap at the back of the tank. I am expecting to see some sort of condensation later on this evening to know that this is working.
I am considering tweaking the my electrical setup. When I get everything up and running, I have decided that I am also keeping the CO2 on a different cycle. I plan to have it come on before the lights and off before the lights.
Reasoning...
Before the Lights turn on, at least an hour (going to tweak this to CO2 levels) so that when the lights do turn on, the tank is at proper CO2 levels so that the plants can using CO2 immediately. Having the CO2 come on when the lights come on, will take it time to build up in the water column, leaving room for possible Algae infestations.
Before the Lights turn off, at least an hour (going to tweak this to CO2 levels) so that when the last light turns off, the CO2 levels have dissipated to lower levels so that eventual livestock won't suffocate due to lack of O2 in the evening.
So, this puts the secondary light and CO2 on a completely different power bar (main power bar is used for Primary lights) and non-Timed side, heater and filter. Time to make some modifications to my stand to accommodate another Power bar.
CO2 will definitely of the 5lb Cylinder variety. Might be a tight squeeze inside the stand, but behind should be fine.
Now looking for a good Check Valve (a few, should be replaced on a yearly basis no matter what) and in large quantity. I hear USPlastics makes some good ones, so might order a few (like 20 or more) for the meanwhile.
Tomorrow's update will truly shock everyone, I'm still in disbelief that things are growing as fast as they are.
Thoughts... I need to get the tank soil moisture lower, humidity a bit higher before concentrating on anything else. My schedule looks like shortly, I'll be jet setting again, so I need to have it under control shortly.
Gary
|
|
|
|
Post by Crazygar on Nov 4, 2018 8:09:17 GMT -5
Saturda...Sunday Update - Week 2 After Planting2 Pints of Stella, a few Rum and Juice along with a good dinner equalled no updates last night. I did take photos in the afternoon so fortunately pics are still within the week time frame.
 As you can see the HC is starting to spread out. I've noticed a few "little" plants popping up all over the substrate. YES! I've also noticed a patch of HC starting to move onto the large rock. Weird... I did manage to kill a hitch-hiker. I was checking out the Buce, when I noticed a green fuzzy strand. Seems a small piece of Java Mess (yes. I spelled it like that intentionally) had stowed away. I went through the rest of the Buce and discovered none. The offending piece was placed in the trash. I've heard comments about the Bubble Counter failing on the regulator I have purchased so I might, in the end, keep using the in tank Diffuser/Bubble Counter and keep the Bubble Counter as a last effort to catch water that happens to backflow if all my valves fail. I will be using the Rhinox (as I'll be using 6mm Airline tubing, as opposed to the Silicone 4mm) Valves and 2 of them. 1 at the top, one closer to my regulator. These will be replaced yearly. So I am on course. Airline tubing 6mm, 2 Check valves and Cylinder will complete the CO2 side. Next; Filter, Ferts. Gary
|
|
|
|
Post by Crazygar on Nov 5, 2018 14:33:43 GMT -5
It's been suggested that I during the photoperiod keep the tank fully exposed to air, mist the plants when needed and cover up totally at night. I might try this as, I do have pools of standing water still forming. The easiest way to dry it out and full exposure.
My problem will be when I start flying again, which will be shortly. I'll figure something up when I get there. So, now I will have to mist a few times a day to keep the plants moist but totally exposing the tank to air during the entire photoperiod hours.
Standing water = algae and/or mold. I want neither.
Gary
|
|
|
|
Post by Crazygar on Nov 7, 2018 6:01:33 GMT -5
Have 2 of these on the way; www.amazon.ca/Rhinox-Brass-Check-Valve-Aquariums/dp/B07DDQC61N/ref=sr_1_2?ie=UTF8&qid=1541587761&sr=8-2&keywords=rhinox+check+valves&dpID=41ywZz0MLCL&preST=_SX300_QL70_&dpSrc=srch, now to get some 4/6 Airline tubing. I've lost half my Buce. It is on the ones at higher elevation, there seems to be a cut off line between life and death in the setup currently. Once again, rather than fuss about the loss, I am concentrating on the survivors. As you will see when I post Saturday's pictures, the cut off zone is quite clear. Been exposing the setup to full atmosphere during the day and the HC is going like crazy. It will be 3 weeks in and already it's taken off like wildfire. Though I believe the soil is super saturated as each time I mist, pools of water form. Thankfully, open air really dries these out quickly. Misting only the Buce every 2 hours. Also a small little container of water in the back to ensure 100% Humidity at night when the tank is totally sealed. My thoughts so far on DSM, I believe I misted too much from the start. The next round, I won't do it as much. This has been a learning curve for myself as well. A rather enjoyable one. Future Project will be a much larger, hi-tech tank. One of those wonderful ADA Tanks from Angelfins. I've been musing about setting up the spare 7.9GAL (remember, I have 2), fill it with water and use it as a testing tank as I get the equipment. This way, when the time comes, I have it dialed in and setup. Also ensuring that everything works according to plan. Last thing I want is to flood the tank to find out the heater/filter doesn't work... this is the problem with having an empty tank sitting around, it just beckons to be used. I am planning a standard pH test. 1 CUP of water. Test after filling, wait 24hrs, test again. Record start/end and difference. This should give me a good idea how the pH value has changed since the water company is most likely switched to "Winter" mode. Big Al's : Stand, Flourite Black Sand Aqua Mania : 3 Seiryu Stones (1 turned into many) and Flourite Black Sand Petsmart : API pH Test Kit Ruffins : Laterite (55oz) Canadian Tire : Gorilla Glue, Single Noma Light Timer (Digital), Black Extension Cord Walmart (Portage Ave location in Winnipeg) : Peat Pucks Petcetra (Ellice Ave location in Winnipeg) : Fluval Flora EBI/Flora (the chain shut down, I bought the entire kit on the final day for 53!!) Finnex Online : 2 X FugeRay Planted+ 11" LED Lights (both for $70, as there was a sale) Wolfpack (online retailer on GTAAquaria Forum) : B.kedagang 'Mini' Amazon.ca : Nano Glass Lily Pipe Set (Inflow and Outflow, 13mm), 2 X Rhinox Brass Check Valves Gary |
|
|
|
Post by Crazygar on Nov 7, 2018 10:17:04 GMT -5
It's a no go on the Finnex, seems they have become hard to find. This is what I did pick up; www.amazon.ca/TechnToy-HW-602B-3-Stage-External-Canister/dp/B00F4NZ7UG/ref=sr_1_1?s=pet-supplies&ie=UTF8&qid=1541603038&sr=1-1&keywords=Tech%27n%27Toy+SunSun+HW-602B+106+GPH+3-Stage+External+Canister+Filter&dpID=41MGprVIoqL&preST=_SX300_QL70_&dpSrc=srch, It's a SunSun 602B. This I can keep under my stand, use the 13mm Lily Pipes (inside hose is 1/2 or 12.7mm, 13mm when I wet it in hot water). The Filter comes with Flow Control valve, so I can reduce/increase until I find a good spot. Quite honestly, I think this is a better choice. I was going to have to do some retrofitting to the Finnex to get it work the way I have envisioned the setup. In a small way, I'd prefer this. This actually cleans a few things up. CO2 will be behind the stand but accessible. I am going to setup a the 7.9GAL (extra one), dry, on a table stand at the same height as my Stand. I can dry install and and configure without interrupting the DSM. As Hannibal Smith once said, "I love it when a plan comes together." This gives me time to work on the equipment, run it if need be and ensure no leaks, no damage etc. I started testing for pH this morning. Out of the tap, pH 7.0 or neutral. Tomorrow, at 9:30 am, going to test again for my 24hr mark. All that is left, CO2 5lb cylinder and 4/6 Airline tubing. But I can work on my mock up (kitchen sounds good) and ensure everything is kosher. Heck, might even start cycling water so jump start the final product. Big Al's : Stand, Flourite Black Sand Aqua Mania : 3 Seiryu Stones (1 turned into many) and Flourite Black Sand Petsmart : API pH Test Kit Ruffins : Laterite (55oz) Canadian Tire : Gorilla Glue, Single Noma Light Timer (Digital), Black Extension Cord Walmart (Portage Ave location in Winnipeg) : Peat Pucks Petcetra (Ellice Ave location in Winnipeg) : Fluval Flora EBI/Flora (the chain shut down, I bought the entire kit on the final day for 53!!) Finnex Online : 2 X FugeRay Planted+ 11" LED Lights (both for $70, as there was a sale) Wolfpack (online retailer on GTAAquaria Forum) : B.kedagang 'Mini' Amazon.ca : Nano Glass Lily Pipe Set (Inflow and Outflow, 13mm), 2 X Rhinox Brass Check Valves, Tech'n'Toy SunSun 602B Canister Filter Gary |
|
|
|
Post by Crazygar on Nov 7, 2018 21:50:34 GMT -5
|
|
|
|
Post by Crazygar on Nov 9, 2018 7:42:11 GMT -5
Big Al's : Stand, Flourite Black Sand
Aqua Mania : 3 Seiryu Stones (1 turned into many) and Flourite Black Sand
Petsmart : API pH Test Kit
Ruffins : Laterite (55oz)
Canadian Tire : Gorilla Glue, Single Noma Light Timer (Digital), Black Extension Cord
Walmart (Portage Ave location in Winnipeg) : Peat Pucks
Petcetra (Ellice Ave location in Winnipeg) : Fluval Flora EBI/Flora (the chain shut down, I bought the entire kit on the final day for 53!!)
Finnex Online : 2 X FugeRay Planted+ 11" LED Lights (both for $70, as there was a sale)
Wolfpack (online retailer on GTAAquaria Forum) : B.kedagang 'Mini'
Amazon.ca : Nano Glass Lily Pipe Set (Inflow and Outflow, 13mm), 2 X Rhinox Brass Check Valves, Tech'n'Toy SunSun 602B Canister Filter
Walmart (Online) : 3 X Flow Control Valves
eBay : 1 X 12" Wave Scissors, 1 X 10" Curved Tweezers
Gary
|
|
|
|
Post by Crazygar on Nov 10, 2018 18:43:27 GMT -5
Saturday Update... Week 3 After Planting I am totally amazed at the progress of this tank. That container you see behind the Spiderwood, is for keeping humidity at 100% I am totally amazed at the progress of this tank. That container you see behind the Spiderwood, is for keeping humidity at 100%
You'll notice that the Buce only grows to a certain level on that Spider wood. Some pieces a bit further up survive, but the 3/4 mark is the death zone. Things will be different when the tank is flooded.
I know the glass is pretty nasty, but I have been using Skanky Goldfish Tank water (thanks neighbor) to use to mist the tank. Things have just exploded. When it's full of water, it's easier to clean, when in this condition, not so much.
Also, exposure to the air, and only misting the Buce every 2 hours have further helped things along. I ran that test this week. Water totally evaporated and then returned after misting, the substrate is super saturated, just have to adjust accordingly.
I am running a test this weekend. First I've only exposed the tank 1 hour to air and left it covered for the rest. The humidity is what I wanted in the beginning. Next time, when I do this, I've learned some valuable lessons but the tank progresses.
No mold, no algae, some pools of water still, but I plan to soak these up tomorrow with paper towel. It seems the humidity creates it's own water source and the Buce responds better to humid than soaked.
I start flying again in 2 weeks after Thanksgiving, so my tests will continue. Possibly placing holes in the Saran Wrap and keeping it closed. That project will commence tomorrow. A trial run to see how things behave. I am going to soak up as much water as I can, and then cover, poke some holes and see what happens.
Have 11" Curved Waved Scissors on the way, along with Curved Tweezers as the Staurogyne is ready for trimming.
I've trimmed a few pieces but I must have Shrek hands, as i can't help but bump things when I work. More items start arriving this week. I'm on course to having everything before the Holiday gets into full swing in December.
See everyone at the meeting tomorrow. Bundle up!
Gary
|
|
|
|
Post by gabor129 on Nov 10, 2018 21:50:21 GMT -5
Nice progress! It’s a great build!
|
|
|
|
Post by Crazygar on Nov 13, 2018 7:18:12 GMT -5
The glass is driving me nuts, but not until am I done with my current experiment shall I clean it.
As for my experiment, so far so good. In fact, for some of the Buce that died, I am starting to see small bits of new growth appearing so I remain hopeful that not all of it is truly lost. Though I will admit, it had to be readjusted from submerged to emersed and I believe I baked it with the lights.
I'll make sure to get some good pictures this Saturday with my DSLR of my new growth and other pictures, and yes, clean that glass! AUGH!
Expecting more deliveries this week which is good, once I have a good part of the gear, I am going to setup my Mock tank and work on getting things configured and dialed in before moving them onto the main tank.
And progress moves on. As usual updates when things happen or Saturday update...
Gary
|
|
|
|
Post by Crazygar on Nov 14, 2018 15:00:10 GMT -5
That was a pleasant surprise! My SunSun external canister filter arrived this afternoon. It wasn't supposed to arrive until closer to the end of the month, 1st week of December. Awesome! Mock Tank Setup Time! MTST.
I have my evening booked, so I will have to tackle this tomorrow. That makes Fallout 76 and Filter for tomorrow. It's going to be a busy evening on Thursday.
My "keeping top sealed" experiment has had another positive effect -- it's cleaned the glass for me. That's an added bonus, it was looking pretty scary. Saturday, I plan to open up and trim the Staurogyne repens as it's growing tall and I wish to coax it growing sideways.
I would prefer to get my CO2 Cylinder here in town, but I want a nice new shiny one. Can't help it, new means I don't have to worry or consider past history.
Gary
|
|
|
|
Post by Crazygar on Nov 15, 2018 15:51:50 GMT -5
I have a small portable table next to my desk here at work where I am slowly assembling items and realized the title of this entry should be, "Trials, Tribulations and Goof Ups"
First, I decided to dissect the SunSun 602B, only to find they sent me a 603B. I contacted them about their error and the return response was, "Happy Holidays". LOL. Awesome, upgraded! Will research what the difference between the 602B and 603B is. So far, they look pretty similar.
I then was dry fitting my glass inflow and outflow lily pipes. The Inflow -- awesome, the outflow, 10mm I/D as opposed to 13mm I/D. So I have to hit Home Depot/Lowes to get a 13mm to 10mm reducer and 10mm I/D hosing to complete the filtration part of the project. Always something. But nothing that's a game changer.
I have noticed that some of my Buce has "rooted" into the substrate, I can't have this happening as the Buce will slowly re-carpet my carpet. Going to move them on Saturday when I open the lid for a breath of fresh air and do some pruning and trimming.
Tank is doing better being sealed with only a few air holes than my constant misting, which was also making the glass look yucky (I know such big words).
I am going to move the offending Buce to further up the branch at the bottom. It also has new growth, the new leaves are bright green as opposed to the Dark green of the parent plant. interesting.
Ordered some black airline tubing for my CO2 and some John Guest Fittings (Quick Connects) for making a clean 90° elbow at the top of the tank. The black tubing will hopefully blend into the black background. My goal is less visual interferences as possible.
Still need:
Inline Bubble Counter, CO2 Cylinder, 1 more basic power bar, 1 standard programmable timer for CO2 On/Off cycles.
Gary
|
|
|
|
Post by Crazygar on Nov 17, 2018 12:47:13 GMT -5
Local Vendors
Aqua Mania : 3 Seiryu Stones (1 turned into many) and Flourite Black Sand
Petsmart : API pH Test Kit
Ruffins : Laterite (55oz)
Canadian Tire : Gorilla Glue, Single Noma Light Timer (Digital), Black Extension Cord
Winnipeg Purchases
Walmart (Portage Ave location in Winnipeg) : Peat Pucks
Petcetra (Ellice Ave location in Winnipeg) : Fluval Flora EBI/Flora (the chain shut down, I bought the entire kit on the final day for 53!!)
Finnex Online : 2 X FugeRay Planted+ 11" LED Lights (both for $70, as there was a sale)
Online Vendors
Big Al's : Stand, Flourite Black Sand
Wolfpack (online retailer on GTAAquaria Forum) : B.kedagang 'Mini'
Amazon.ca : Nano Glass Lily Pipe Set (Inflow and Outflow, 13mm), 2 X Rhinox Brass Check Valves, Tech'n'Toy SunSun 602B Canister Filter
, ISTA Hose Adapter connector 12/16mm & 16/22mm, Norpro 3080 Mini Measuring Spoons
Walmart (Online) : 3 X Flow Control Valves
eBay : 1 X 12" Wave Scissors, 1 X 10" Curved Tweezers
More Amazon Purchases, which includes an Adapter from 9/12 Hose to 12/16 hose (or in my case, vice versa) with a Lock Nut on each end. BONUS! Also, the mini-measuring spoons for me EI Dosing (EI sounds easier and right up my alley, routine).
Realized, I wish to change out all the hoses (12/16 that came with the SunSun) to black. With this, no algae growth EVER inside the tubing. With clear, it always happens. I'll look for 9/12 as well. Looks like a trip to Lowes tomorrow.
Also considering just before I flood the tank, one more order of Buce. When they arrive, I flood the tank afterwards. Wolfpack's Buce are all submerged, this would eliminate the "re-adaptation" phase and fill out that piece of Spiderwood (also, if anyone has a stray branch of that around, I'd be willing to purchase it).
Gary
|
|
|
|
Post by Crazygar on Nov 17, 2018 19:41:01 GMT -5
Whew... almost didn't make it. I started this at 2:30pm. A Windows update corrupted my video drivers and SDHC Device information.. darn you Bill Gates...Saturday Update - 1 Month After Planting (1 A.P.)Wow, things are really taking off. My experiment worked. For one solid week, I did not open the tank to mist or air exchange at all.
I let humidity be the force while the small air holes I punctured on the top were for gas exchange. Quite honestly, as I've said before, I should have done this all along. I removed the old saran wrap and replaced it with new stuff not before;
1) Doing much needed pruning of the Staurogyne repens
2) Doing much needed relocating of the Buce at the base of the Spiderwood
I had the tank exposed to air for 10 minutes while I trimmed and rescaped the tank. I remisted, recovered (ha ha) and here are the final pictures for this week... A tank in the mist. Really should have cleaned the glass, but it's the view when it's all sealed up. 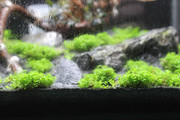 HC Cluster at front. You'll notice something...  ...a root system!  A much better, pruned tank shot. Buce has been moved to within the Goldilocks Zone on the Spiderwood, trimmed and moved pieces of Staurogyne repens around Gary
|
|
|
|
Post by gabor129 on Nov 18, 2018 18:09:48 GMT -5
Looking great Gary! The root system is a testament of your good work!
|
|


